
The Windows Subsystem for Linux, introduced in the Anniversary Update, became a stable feature in the Fall Creators Update. You can now run Ubuntu and openSUSE on Windows, with Fedora and more Linux distributions coming soon.
What You Need to Know About Windows 10’s Bash Shell
This isn’t a virtual machine, a container, or Linux software compiled for Windows (like Cygwin). Instead, Windows 10 offers a full Windows Subsystem intended for Linux for running Linux software. It’s based on Microsoft’s abandoned Project Astoria work for running Android apps on Windows.
Think of it as the opposite of Wine. While Wine allows you to run Windows applications directly on Linux, the Windows Subsystem for Linux allows you to run Linux applications directly on Windows.
Microsoft worked with Canonical to offer a full Ubuntu-based Bash shell environment that runs atop this subsystem. Technically, this isn’t Linux at all. Linux is the underlying operating system kernel, and that isn’t available here. Instead, this allows you to run the Bash shell and the exact same binaries you’d normally run on Ubuntu Linux. Free software purists often argue the average Linux operating system should be called “GNU/Linux” because it’s really a lot of GNU software running on the Linux kernel. The Bash shell you’ll get is really just all those GNU utilities and other software.
While this feature was originally called “Bash on Ubuntu on Windows,” it also allows you to run Zsh and other command-line shells. It now supports other Linux distributions, too. You can choose openSUSE Leap or SUSE Enterprise Server instead of Ubuntu, and Fedora is also on its way.
There are some limitations here. This doesn’t yet support background server software, and it won’t officially work with graphical Linux desktop applications. Not every command-line application works, either, as the feature isn’t perfect.
How to Install Bash on Windows 10
This feature doesn’t work on the 32-bit version of Windows 10, so ensure you’re using the 64-bit version of Windows. It’s time to switch to the 64-bit version of Windows 10 if you’re still using the 32-bit version, anyway.
Assuming you have 64-bit Windows, to get started, head to Control Panel > Programs > Turn Windows Features On Or Off. Enable the “Windows Subsystem for Linux” option in the list, and then click the “OK” button.
Click “Restart now” when you’re prompted to restart your computer. The feature won’t work until you reboot.
Note: Starting with the Fall Creators Update, you no longer have to enable Developer Mode in the Settings app to use this feature. You just need to install it from the Windows Features window.

After your computer restarts, open the Microsoft Store from the Start menu, and search for “Linux” in the store. Click “Get the apps” under the “Linux on Windows?” banner.
Note: Starting with the Fall Creators Update, you can no longer install Ubuntu by running the “bash” command. Instead, you have to install Ubuntu or another Linux distribution from the Store app.

You’ll see a list of every Linux distribution currently available in the Windows Store. As of the Fall Creators Update, this includes Ubuntu, openSUSE Leap, and openSUSE Enterprise, with a promise that Fedora will arrive soon.
Update: Debian and Kali are now available in the Store, but aren’t listed here. Search for “Debian Linux” or “Kali Linux” to find and install them.
To install a Linux distribution, click it, and then click the “Get” or “Install” button to install it like any other Store application.
If you’re not sure which Linux environment to install, we recommend Ubuntu. This popular Linux distribution was previously the only option available, but other Linux systems are now available for people who have more specific needs.

You can also install multiple Linux distributions and they’ll each get their own unique shortcuts. You can even run multiple different Linux distributions at a time in different windows.
How to Use The Bash Shell and Install Linux Software
You now have a full command-line bash shell based on Ubuntu, or whatever other Linux distribution you installed.
Because they’re the same binaries, you can use Ubuntu’s apt or apt-get command to install software from Ubuntu’s repositories if you’re using Ubuntu. Just use whatever command you’d normally use on that Linux distribution. You’ll have access to all the Linux command line software out there, although some applications may not yet work perfectly.
To open the Linux environment you installed, just open the Start menu and search for whatever distribution you installed. For example, if you installed Ubuntu, launch the Ubuntu shortcut.
You can pin this application shortcut to your Start menu, taskbar, or desktop for easier access.

The first time you launch the Linux environment, you’re be prompted to enter a UNIX username and password. These don’t have to match your Windows username and password, but will be used within the Linux environment.
For example, if you enter “bob” and “letmein” as your credentials, your username in the Linux environment will be “bob” and the password you use inside the Linux environment will be “letmein”—no matter what your Windows username and password are.

You can launch your installed Linux environment by running the
wsl command. If you have multiple Linux distributions installed, you can choose the default Linux environment this command launches.
If you have Ubuntu installed, you can also run the
ubuntu command to install it. For openSUSE Leap 42, use opensuse-42 . For SUSE Linux Enterprise Sever 12, use sles-12 . These commands are listed on each Linux distribution’s page on the Windows Store.
You can still launch your default Linux environment by running the
bash command, but Microsoft says this is deprecated. This means the bash command may stop functioning in the future.
If you’re experienced using a Bash shell on Linux, Mac OS X, or other platforms, you’ll be right at home.
On Ubuntu, you need to prefix a command with
sudo to run it with root permissions. The “root” user on UNIX platforms has full system access, like the “Administrator” user on Windows. Your Windows file system is located at /mnt/c in the Bash shell environment.
Use the same Linux terminal commands you’d use to get around. If you’re used to the standard Windows Command Prompt with its DOS commands, here are a few basic commands common to both Bash and Windows:
- Change Directory:
cdin Bash,cdorchdirin DOS - List Contents of Directory:
lsin Bash,dirin DOS - Move or Rename a File:
mvin Bash,moveandrenamein DOS - Copy a File:
cpin Bash,copyin DOS - Delete a File:
rmin Bash,delorerasein DOS - Create a Directory:
mkdirin Bash,mkdirin DOS - Use a Text Editor:
viornanoin Bash,editin DOS
It’s important to remember that, unlike Windows, the Bash shell and its Linux-imitating environment are case-sensitive. In other words, “File.txt” with a capital letter is different from “file.txt” without a capital.
For more instructions, consult our beginner’s guide to the Linux command-line and other similar introductions to the Bash shell, Ubuntu command line, and Linux terminal online.

You’ll need to use the apt command to install and update the Ubuntu environment’s software. Be sure to prefix these commands with
sudo , which makes them run as root–the Linux equivalent of Administrator. Here are the apt-get commands you’ll need to know:- Download Updated Information About Available Packages:
sudo apt update - Install an Application Package:
sudo apt install packagename(Replace “packagename” with the package’s name.) - Uninstall an Application Package:
sudo apt remove packagename(Replace “packagename” with the package’s name.) - Search for Available Packages:
sudo apt search word(Replace “word” with a word you want to search package names and descriptions for.) - Download and Install the Latest Versions of Your Installed Packages:
sudo apt upgrade
If you installed a SUSE Linux distribution, you can use the zypper command to install software instead.
After you’ve downloaded and installed an application, you can type its name at the prompt, and then press Enter to run it. Check that particular application’s documentation for more details.

Bonus: Install the Ubuntu Font for a True Ubuntu Experience
If you want a more accurate Ubuntu experience on Windows 10, you can also install the Ubuntu fonts and enable them in the terminal. You don’t have to do this, as the default Windows command prompt font looks pretty good to us, but it’s an option.
Here’s what it looks like:

To install the font, first download the Ubuntu Font Family from Ubuntu’s website. Open the downloaded .zip file and locate the “UbuntuMono-R.ttf” file. This is the Ubuntu monospace font, which is the only one used in the terminal. It’s the only font you need to install.

Double-click the “UbuntuMono-R.ttf” file and you’ll see a preview of the font. Click “Install” to install it to your system.

To make the Ubuntu monospace font become an option in the console, you’ll need to add a setting to the Windows registry.
Open a registry editor by pressing Windows+R on your keyboard, typing
regedit , and then pressing Enter. Navigate to the following key or copy and paste it into the Registry Editor’s address bar:HKEY_LOCAL_MACHINE\SOFTWARE\Microsoft\Windows NT\CurrentVersion\Console\TrueTypeFont

Right-click in the right pane and select New > String Value. Name the new value
000 .
Double-click the “000” string you just created, and then enter
Ubuntu Mono as its value data.
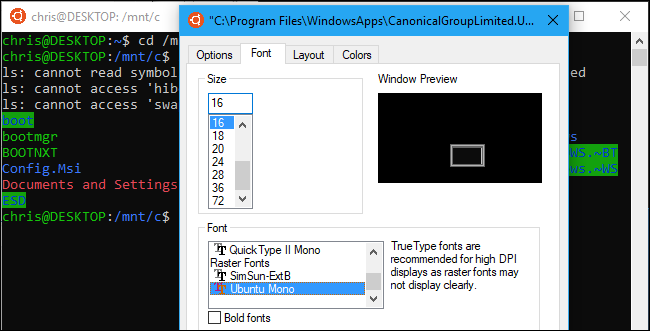
Launch an Ubuntu window, right-click the title bar, and then select the “Properties” command. Click the “Font” tab, and then select “Ubuntu Mono” in the font list.
Software you install in the Bash shell is restricted to the Bash shell. You can access these programs from the Command Prompt, PowerShell, or elsewhere in Windows, but only if you run the
bash -c command.
Referensi
[How?]
17.00.00


