Sabtu, 23 Maret 2019

Jenis-jenis Tipe Data C++ dan Contoh Pemakaiannya

Posted by with No comments

Pengertian Tipe Data


Tipe data merupakan identifier atau pengenal suatu variabel. Tipe data akan memberitahukan kepada compiler mengenai jenis tipe data dan seberapa lebar compiler mengalokasikan ruang memori untuk suatu variabel. Sehingga dengan mekanise alokasi memori pada pemrograman C++, program yang berjalan akan lebih efisien dari segi memori.
Tipe data dalam pemrograman terkhusus C++ dapat dibedakan berdasarkan adanya tanda (signed) dan tidak adanya tanda (unsigned). Perbedaan antara keduanya adalah adanya tanda bilangan yang menunjukan positif dan negatif. Untuk tipe data unsigned (tanpa tanda) suatu bilangan hanya diawali dari 0 ke suatu jangkauan tertentu, sedangkan untuk tipe signed (bertanda), bilangan diawali dari nilai negatif (-) menuju ke jangkauan nilai positif (+).
“A data type or simply type is a classification of data which tells the compiler or interpreter how the programmer intends to use the data”.
Terjemahannya:
“Tipe data atau kadang disingkat dengan ‘tipe’ saja adalah sebuah pengelompokan data untuk memberitahu compiler atau interpreter bagaimana programmer ingin mengolah data tersebut”.

Jenis-Jenis Tipe Data


1. Tipe Data Boolean (Bool)

Boolean adalah salah satu tipe data yang hanya memiliki dua pilihan yaitu True (1) atau False (0). Tipe data ini biasanya digunakan untuk memberikan kondisi pada program. …atau bisa juga memastikan kebenaran dari sebuah operasi.

Besarnya memori yang dibutuhkan tipe data bool yaitu 1 byte atau 8 bit.

#include <iostream>
using namespace std;
int main()
{
   int angka;
   bool hasil;
   cout << "Masukan angka = "; cin >> angka;
   hasil = angka > 10;
   cout << hasil;
}


Pada contoh program diatas, kita menggunakan 2 buah variabel yaitu variabel angka dengan tipe data integer, dan variabel hasil dengan tipe data boolean.

Nah, disini saya akan mengambil nilai/value untuk variabel hasil dengan membandingkan nilai pada variabel angka terhadap bilangan 10.

Apabila nilai pada variabel angka lebih dari 10 maka hasil bernilai 1 (true) dan jika angka lebih kecil dari 10 maka hasilnya bernilai 0 (false).

2. Tipe Data Character (Char)

Character adalah salah satu tipe data yang memungkinkan kita untuk memesan memori berformat text (huruf, angka, dan simbol) dengan karakter tunggal. Besarnya memori yang dibutuhkan tipe data char yaitu 1 byte atau 8 bit. 

Berikut ini contoh program C++ menggunakan tipe data char:
#include <iostream>
using namespace std;
int main(){
   char nilai;
   cout << "Masukan nilai (A/B/C/D): "; cin>>nilai;
   cout << "Nilai anda:" << nilai;
}
Perlu diingat bahwa tipe data char hanya dapat menyimpan data berbentuk karakter dan hanya satu karakter, oleh karena itu apabila anda memasukan lebih dari 1 karakter maka nilai yang akan tersimpan hanya karakter pertama.

3. Tipe Data Integer (Int)
Integer adalah salah satu tipe data numerik yang memungkinakan kita untuk menyimpan data dalam bentuk bilangan bulat.
Besarnya memori yang dibutuhkan tipe data int yaitu 4 byte atau 32 bit. Berikut ini contoh program C++ menggunakan tipe data int
#include <iostream>
using namespace std;
int main(){
   int x,y,z;
   x=3; y=4;
   z=x*y;
   cout << "Hasil perkalian: " << z;
}
Dengan menggunakan tipe data integer hal ini memungkinkan kita untuk melakukan sejumlah operasi aritmetika seperti perkalian dan lain sebagainya.
Pada contoh diatas, saya menggunakan 3 buah variabel beripe integer sebagai berikut: x bernilai 3, y bernilai 4, dan z sebagai hasil hasil perkalian x dan y.

4. Tipe Data Floating Point (Float)
Floating Point adalah tipe data numerik yang memungkinkan untuk menyimpan nilai dalam memori bersifat bilangan pecahan atau real, maupun eksponensial.
Besarnya memori yang dibutuhkan tipe data float yaitu 4 byte atau 32 bit. Berikut ini contoh program C++ menggunakan tipe data float:
#include <iostream>
using namespace std;
int main(){
   float jari, hasil ;
   const float p=3.14;
   cout << "Masukan Jumlah jari-jari = "; cin >> jari;
   hasil = (jari * p) * 2;
   cout << "Keliling dari Lingkaran adalah " << hasil;
}

5. Tipe Data Double Floating Point (Double)
Double Floating Point sama seperti float yaiut salah satu tipe data yang bersifat menyatakan bilangan pecahan atau real, maupun eksponensial.
Bedanya adalah penyimpanan angka masimal lebih besar daripada float dan otomatis double juga akan membutuhkan memori yang lebih besar.
Besarnya memori yang dibutuhkan tipe data double yaitu 8 byte atau 64 bit. Berikut ini contoh program C++ menggunakan tipe data double:
#include <iostream>
using namespace std;
int main(){
   double jari, hasil ;
   const double p=3.1428;
   cout << "Masukan Jumlah jari-jari = "; cin >> jari;
   hasil = jari*(jari * p);
   cout << "Luas lingkaran: " << hasil;
}

6. Tipe Data String (String)
String merupakan tipe data text (huruf, angka, dan simbol) yang memungkinkan kita menyimpan nilai dengan bentuk text, kumpulan dari character.
Besarnya memori yang dibutuhkan tipe data string yaitu 4 byte atau 32 bit. Berikut ini contoh program C++ menggunakan tipe data string:
#include <iostream>
using namespace std;
int main(){
   string nohp;
   cout << "Masukan nomor HP: "; cin >> nohp;
   cout << "Nomor HP anda: " << nohp;
}
Sama seperti halnya tipe data char, dalam tipe data string kita bisa menggunakan karakter dan angka dengan ketentuan tidak dapat dilakukan operasi aritmetika.
Namun perbedaannya, jika dalam tipe data char kita hanya mampu menyimpan nilai satu karakter untuk tiap variabel, hal ini tidak berlaku pada tipe data string.
7. Tipe Data Void (Void)
Valueless adalah salah satu tipe data yang berarti “tidak ada” atau “tidak mempunyai tipe data”. Namun disini kita belum akan membahasnya lebih detail.
Void termasuk katagori tipe data namun kita tidak bisa menggunakanya pada variabel biasa, void biasanya digunakan pada function yang tidak mempunyai return value.
Besarnya memori yang dibutuhkan tipe data void yaitu 1 byte atau 8 bit.

Referensi :

Rabu, 20 Maret 2019

Evolusi Penggun Sistem Operasi Windows

Posted by with No comments
Windows adalah sistem operasi yang sangat terkenal di seluruh dunia. Hampir setiap orang yang memiliki PC atau laptop menggunakan sistem operasi ini.
Windows 1.0 adalah sisem operasi pertama yang di keluarkan oleh Microsoft , rilis pada 20/11/1985. semenjak itu windows berkembang terus dan melakukan perubahan di setiap versi yang di rilisnya.

Win 98, Win Xp ,Windows 7 dan sekarang Windows 8.1 adalah versi paling populer yang di keluarkan oleh Microsoft. setiap versi dari windows pun berkembang sejalan dengan perkembangan teknologi komputer / PC yang mempengaruhi penggunanya juga.
selain Sistem yang berubah perangkat yang di gunakan pun berubah, berikut infografis tentan perkembangan pengguna sistem operasi windows
EVOLUSI PENGGUNA SISTEM OPERASI WINDOWS
1. Windows 1.0 -- 1985
2. Windows 3.1 -- 1992
3. Windows 95 -- 1995
4. Windows 98 -- 1998
5. Windows 2000 -- 2000
6. Windows XP -- 2001
7. Windows Vista -- 2007
8. Windows 7 -- 2009
9. Windows 8 -- 2012
10. Windows 8.1 -- 2013
11. Windows 10 -- 2015
Referensi

Selasa, 05 Maret 2019

Internet Broadband : Definisi dan Jenis - jenis Koneksi Internet Broadband

Posted by with No comments

Definisi Internet Broadband

Internet Broadband adalah istilah generik yang digunakan untuk berbagai jenis koneksi internet dengan mengunakan teknologi broadband.
Pengertian Broadband dalam arti harfiah, berarti jangkauan frekuensi yang luas yang digunakan untuk mengirim dan menerima data. Sebelumnya, proses akses internet dial-up sangatlah lambat, kecepatankoneksi dial-up terlalu lamban karena saluran telepon tetap sibuk saat mengakses internet. Faktor-faktor inilah  membuat metode koneksi broadband ini disukai untuk akses internet.
Apa yang ditawarkan oleh layanan broadband? Tentunya akses data multimedia berkecepatan tinggi berupa layanan gambar, audio, dan video, termasuk video streaming, video downloading, video telephony, dan video messaging. Melalui perangkat yang mendukung teknologi tersebut, pengguna juga bisa mengakses hiburan mobile TV dan mengunduh musik, serta melakukan komunikasi real-time menggunakan teknologi fixed-mobile, seperti webcam melalui ponsel.
Broadband adalah koneksi kecepatan tinggi yang memungkinkan akses Internet secara cepat dan selalu terkoneksi atau “always on”. Kalau dirunut ke belakang, sejarah broadband bergerak mulai dari ditemukannya kabel serat optik pada tahun 1950, dimana sebelumnya kebutuhan komunikasi data belum dibutuhkan dalam kecepatan tinggi. Baru pada 1990an muncul kebutuhan yang besar terhadap transfer data kecepatan tinggi dan era broadband mulai. Saat itu, andalannya lebih pada kabel serat optik.
Istilah, broadband mengacu pada koneksi bandwidth  internet. Istilah bandwidth umumnya digunakan untuk merujuk pada kecepatan transfer data, dalam hal jaringan komputer dan koneksi internet.  transfer data biasanya diukur dalam bit per detik (bps). Dalam koneksi internet broadband, kecepatan transfer sangat tinggi dibandingkan dengan koneksi dial-up internet. Ada berbagai jenis koneksi internet broadband, tergantung pada kecepatan, biaya dan ketersediaan. Beberapa jenis koneksi internet broadband :

Koneksi Internet Broadband ADSL dan SSL

ADSL adalah koneksi broadband yang paling umum digunakan. Hal ini banyak digunakan untuk keperluanrumahan dan komersial. ADSL merupakan saluran digital yang dapat digunakan untuk mengakses internet tanpa mengganggu saluran telepon. ADSL bekerja pada kecepatan 512 kbps keatas. ADSL memungkinkan kecepatan internet koneksi tinggi  tanpa mengganggu kesibukan saluran telepon. Dalam kasus koneksi ADSL, kecepatan download lebih besar daripada kecepatan upload,  Hal inilah sehingga  diistilahkan dengan ‘asimetris’ karena perbedaan dalam kecepatan download dan upload.
SDSL (Symmetric Digital Subscriber Line), SDSL mirip dengan ADSL, hanya berbeda dalam satu aspek, yaitu kecepatan upload. koneksi internet  broadband  SDSL  ditandai dengan kecepatan upload  dan  download identik. Hal ini bermanfaat untuk tujuan komersial dan bisnis jika memerlukan kecepatan upload yang tinggi, dan koneksi SDSL memenuhi persyaratan untuk itu. Biaya SDSL lebih mahal dibanding ADSL, tetapi hal ini bukanlah menjadi beban jika mempertimbangkan keuntungan dari sisi bisnis.

Koneksi Internet Broadband Wireless

Koneksi internet nirkabel adalah kebutuhan sepanjang hari. Saat  ini, laptop, palmtop dan ponsel, semua memiliki koneksi internet nirkabel.  kecepatan  proses download yang disediakan oleh jenis akses  teknologi  ini berkisar 128 kbps sampai 2Mbps. Teknologi ini berkembang karena meningkatnya penggunaan perangkat nirkabel seperti ponsel dan laptop.dan kapsul.

Koneksi Kabel Internet Broadband

Internet dapat diakses melalui sambungan TV kabel. Koneksi kabel internet  broadband dibuat tersedia bersama dengan saluran TV kabel. Kabel koneksi internet  broadband menyediakan kecepatan mulai dari 2 Mbps sampai 8 Mbps. Sambungan secara luas digunakan di daerah perumahan di beberapa kota-kota besar. Hal ini lebih populer dibandingkan dengan koneksi internet ADSL, meskipun kecepatan download dan upload dari kedua jenis koneksi internet ini  adalah sama.

Koneksi Internet Broadband Satelit

Semua bentuk koneksi  broadband internet yang dijelaskan di atas memiliki keterbatasan jangkauan secara geografis, koneksi internet Satelit broadband adalah solusi untuk masalah ini. Dalam jenis koneksi internet, satelit geostasioner menyediakan akses internet. Hal ini membutuhkan parabola dan diperlukan. perangkat keras pendukung lainnya untuk menerima sinyal.  Kecepatan yang ditawarkan oleh koneksi internet satelit adalah 2 Mbps untuk download dan 1 Mbps untuk upload. Kecepatan ini lebih sedikit dibandingkan dengan jenis lain dari koneksi broadband. Pada koneksi satelit broadband faktor cuaca mempengaruhi sebagian besar.sinyal pada jenis koneksi internet broadband ini.

Koneksi Faktor Pendorong Broadband :

  • Untuk PemerintahBroadband
  1. Broadband dilihat sebagai infrastruktur penting untuk mencapai tujuan-tujuan-tujuan pemerintah di bidang sosio-ekonomi.
  2. Untuk mendorong penyediaaan layanan publik seperti E-governance, E-learning, Tele-medicine.


  • Untuk Penyelenggara Jaringan / Jasa Telekomunikasi
  1. Suatu pilihan untuk mengurangi penurunan pendapatan dari teknologi lama (POTS “Plain old telephone service”/PSTN “Public Switched Telephone Network”).
  2. Potensi tambahan pendapatan dari Layanan Nilai Tambah.
  3. Potensi penambahan secara eksponensial dalam ARPU “Average Revenue Per Unit”.
  • Untuk Konsumen
  1. Tersedianya rentang aplikasi yang lebih banyak dan lebih kaya.
  2. Akses yang lebih cepat terhadap informasi.
  3. Layanan yang semakin mengarah konvergensi (VOIP, Video on Demand).

Refrensi :

Definisi

Faktor Pendorong

Kamis, 28 Februari 2019

How to Install and Use the Linux Bash Shell on Windows 10

Posted by with No comments
The Windows Subsystem for Linux, introduced in the Anniversary Update, became a stable feature in the Fall Creators Update. You can now run Ubuntu and openSUSE on Windows, with Fedora and more Linux distributions coming soon.

What You Need to Know About Windows 10’s Bash Shell

This isn’t a virtual machine, a container, or Linux software compiled for Windows (like Cygwin). Instead, Windows 10 offers a full Windows Subsystem intended for Linux for running Linux software. It’s based on Microsoft’s abandoned Project Astoria work for running Android apps on Windows.
Think of it as the opposite of Wine. While Wine allows you to run Windows applications directly on Linux, the Windows Subsystem for Linux allows you to run Linux applications directly on Windows.
Microsoft worked with Canonical to offer a full Ubuntu-based Bash shell environment that runs atop this subsystem. Technically, this isn’t Linux at all. Linux is the underlying operating system kernel, and that isn’t available here. Instead, this allows you to run the Bash shell and the exact same binaries you’d normally run on Ubuntu Linux. Free software purists often argue the average Linux operating system should be called “GNU/Linux” because it’s really a lot of GNU software running on the Linux kernel. The Bash shell you’ll get is really just all those GNU utilities and other software.
While this feature was originally called “Bash on Ubuntu on Windows,” it also allows you to run Zsh and other command-line shells. It now supports other Linux distributions, too. You can choose openSUSE Leap or SUSE Enterprise Server instead of Ubuntu, and Fedora is also on its way.
There are some limitations here. This doesn’t yet support background server software, and it won’t officially work with graphical Linux desktop applications. Not every command-line application works, either, as the feature isn’t perfect.

How to Install Bash on Windows 10

This feature doesn’t work on the 32-bit version of Windows 10, so ensure you’re using the 64-bit version of Windows. It’s time to switch to the 64-bit version of Windows 10 if you’re still using the 32-bit version, anyway.
Assuming you have 64-bit Windows, to get started, head to Control Panel > Programs > Turn Windows Features On Or Off. Enable the “Windows Subsystem for Linux” option in the list, and then click the “OK” button.
Click “Restart now” when you’re prompted to restart your computer. The feature won’t work until you reboot.
Note: Starting with the Fall Creators Update, you no longer have to enable Developer Mode in the Settings app to use this feature. You just need to install it from the Windows Features window.
After your computer restarts, open the Microsoft Store from the Start menu, and search for “Linux” in the store. Click “Get the apps” under the “Linux on Windows?” banner.
Note: Starting with the Fall Creators Update, you can no longer install Ubuntu by running the “bash” command. Instead, you have to install Ubuntu or another Linux distribution from the Store app.
You’ll see a list of every Linux distribution currently available in the Windows Store. As of the Fall Creators Update, this includes Ubuntu, openSUSE Leap, and openSUSE Enterprise, with a promise that Fedora will arrive soon.
UpdateDebian and Kali are now available in the Store, but aren’t listed here. Search for “Debian Linux” or “Kali Linux” to find and install them.
To install a Linux distribution, click it, and then click the “Get” or “Install” button to install it like any other Store application.
If you’re not sure which Linux environment to install, we recommend Ubuntu. This popular Linux distribution was previously the only option available, but other Linux systems are now available for people who have more specific needs.
You can also install multiple Linux distributions and they’ll each get their own unique shortcuts. You can even run multiple different Linux distributions at a time in different windows.

How to Use The Bash Shell and Install Linux Software

You now have a full command-line bash shell based on Ubuntu, or whatever other Linux distribution you installed.
Because they’re the same binaries, you can use Ubuntu’s apt or apt-get command to install software from Ubuntu’s repositories if you’re using Ubuntu. Just use whatever command you’d normally use on that Linux distribution. You’ll have access to all the Linux command line software out there, although some applications may not yet work perfectly.
To open the Linux environment you installed, just open the Start menu and search for whatever distribution you installed. For example, if you installed Ubuntu, launch the Ubuntu shortcut.
You can pin this application shortcut to your Start menu, taskbar, or desktop for easier access.
The first time you launch the Linux environment, you’re be prompted to enter a UNIX username and password. These don’t have to match your Windows username and password, but will be used within the Linux environment.
For example, if you enter “bob” and “letmein” as your credentials, your username in the Linux environment will be “bob” and the password you use inside the Linux environment will be “letmein”—no matter what your Windows username and password are.
You can launch your installed Linux environment by running the wsl command. If you have multiple Linux distributions installed, you can choose the default Linux environment this command launches.
If you have Ubuntu installed, you can also run the ubuntu command to install it. For openSUSE Leap 42, use  opensuse-42 . For SUSE Linux Enterprise Sever 12, use sles-12 . These commands are listed on each Linux distribution’s page on the Windows Store.
You can still launch your default Linux environment by running the bash command, but Microsoft says this is deprecated. This means the bash command may stop functioning in the future.
If you’re experienced using a Bash shell on Linux, Mac OS X, or other platforms, you’ll be right at home.
On Ubuntu, you need to prefix a command with  sudo to run it with root permissions. The “root” user on UNIX platforms has full system access, like the “Administrator” user on Windows. Your Windows file system is located at /mnt/c in the Bash shell environment.
Use the same Linux terminal commands you’d use to get around. If you’re used to the standard Windows Command Prompt with its DOS commands, here are a few basic commands common to both Bash and Windows:
  • Change Directory: cd in Bash, cd or  chdir in DOS
  • List Contents of Directory:  ls in Bash, dir in DOS
  • Move or Rename a File: mv in Bash, move and  rename in DOS
  • Copy a File: cp in Bash,  copy in DOS
  • Delete a File: rm in Bash,  del or erase in DOS
  • Create a Directory:  mkdir in Bash, mkdir in DOS
  • Use a Text Editor: vi or nano in Bash,  edit in DOS
It’s important to remember that, unlike Windows, the Bash shell and its Linux-imitating environment are case-sensitive. In other words, “File.txt” with a capital letter is different from “file.txt” without a capital.
For more instructions, consult our beginner’s guide to the Linux command-line and other similar introductions to the Bash shell, Ubuntu command line, and Linux terminal online.
You’ll need to use the apt command to install and update the Ubuntu environment’s software.  Be sure to prefix these commands with sudo , which makes them run as root–the Linux equivalent of Administrator. Here are the apt-get commands you’ll need to know:
  • Download Updated Information About Available Packages: sudo apt update
  • Install an Application Package:  sudo apt install packagename (Replace “packagename” with the package’s name.)
  • Uninstall an Application Package:  sudo apt remove packagename (Replace “packagename” with the package’s name.)
  • Search for Available Packages:  sudo apt search word (Replace “word” with a word you want to search package names and descriptions for.)
  • Download and Install the Latest Versions of Your Installed Packages: sudo apt upgrade
If you installed a SUSE Linux distribution, you can use the zypper command to install software instead.
After you’ve downloaded and installed an application, you can type its name at the prompt, and then press Enter to run it. Check that particular application’s documentation for more details.

Bonus: Install the Ubuntu Font for a True Ubuntu Experience

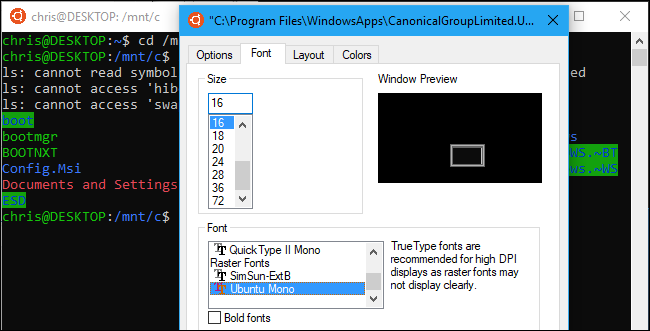
If you want a more accurate Ubuntu experience on Windows 10, you can also install the Ubuntu fonts and enable them in the terminal. You don’t have to do this, as the default Windows command prompt font looks pretty good to us, but it’s an option.
Here’s what it looks like:
To install the font, first download the Ubuntu Font Family from Ubuntu’s website. Open the downloaded .zip file and locate the “UbuntuMono-R.ttf” file. This is the Ubuntu monospace font, which is the only one used in the terminal. It’s the only font you need to install.
Double-click the “UbuntuMono-R.ttf” file and you’ll see a preview of the font. Click “Install” to install it to your system.
To make the Ubuntu monospace font become an option in the console, you’ll need to add a setting to the Windows registry.
Open a registry editor by pressing Windows+R on your keyboard, typing regedit , and then pressing Enter. Navigate to the following key or copy and paste it into the Registry Editor’s address bar:
HKEY_LOCAL_MACHINE\SOFTWARE\Microsoft\Windows NT\CurrentVersion\Console\TrueTypeFont
Right-click in the right pane and select New > String Value. Name the new value 000 .
Double-click the “000” string you just created, and then enter Ubuntu Mono as its value data.
Launch an Ubuntu window, right-click the title bar, and then select the “Properties” command. Click the “Font” tab, and then select “Ubuntu Mono” in the font list.

Software you install in the Bash shell is restricted to the Bash shell. You can access these programs from the Command Prompt, PowerShell, or elsewhere in Windows, but only if you run the bash -c command.
Referensi
[How?]

Selasa, 09 Oktober 2018

Modulasi AM (Amplitude Modulation)

Posted by with No comments

Modulasi Amplitudo (Amplitude Modulation, AM)

Modulasi Amplitudo (Amplitude Modulation, AM) adalah proses menumpangkan sinyal informasi ke sinyal pembawa (carrier) dengan sedemikian rupa sehingga amplitudo gelombang pembawa berubah sesuai dengan perubahan simpangan (tegangan) sinyal informasi. Pada jenis modulasi ini amplituda sinyal pembawa diubah-ubah secara proporsional terhadap amplituda sesaat sinyal pemodulasi, sedangkan frekuensinya tetap selama proses modulasi.


Bentuk Sinyal Modulasi Amplitudo (AM)


Sinyal pembawa berupa gelombang sinus dengan persamaan matematisnya: